DEEPEST and LONGEST INGROWN NAIL REMOVED

DEEPEST and LONGEST INGROWN NAIL REMOVED

More information about nail surgery for chronically ingrowing toenails.

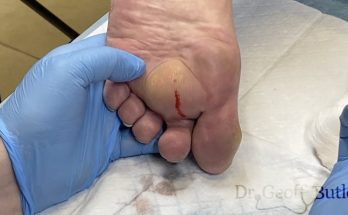
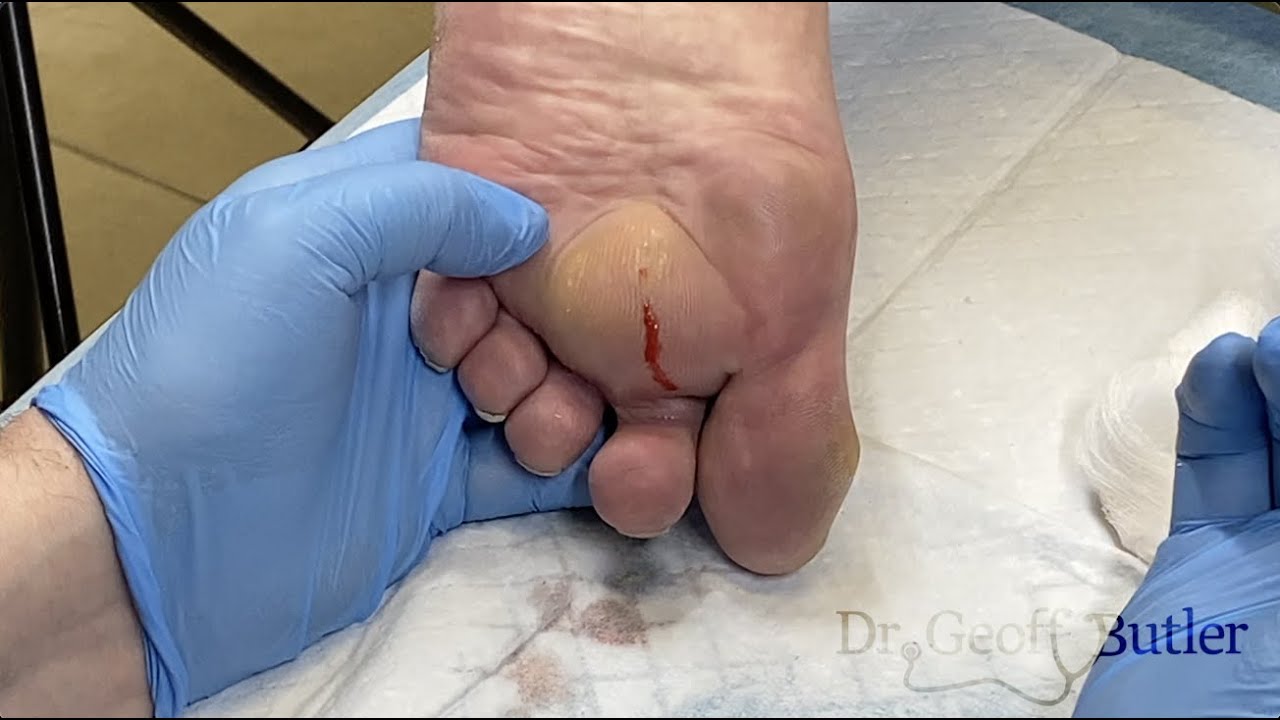
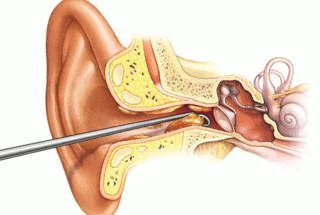
Nail surgery is a procedure to remove either the entire nail plate (total nail avulsion), or slivers from either side of the nail (partial nail avulsion/s), under local anaesthetic.

This can be undertaken by a podiatrist, suitably-trained GP or an orthopaedic surgeon. 

You may need to undergo surgery when you develop one of the following conditions:

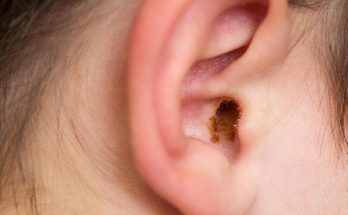
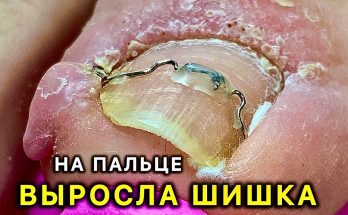
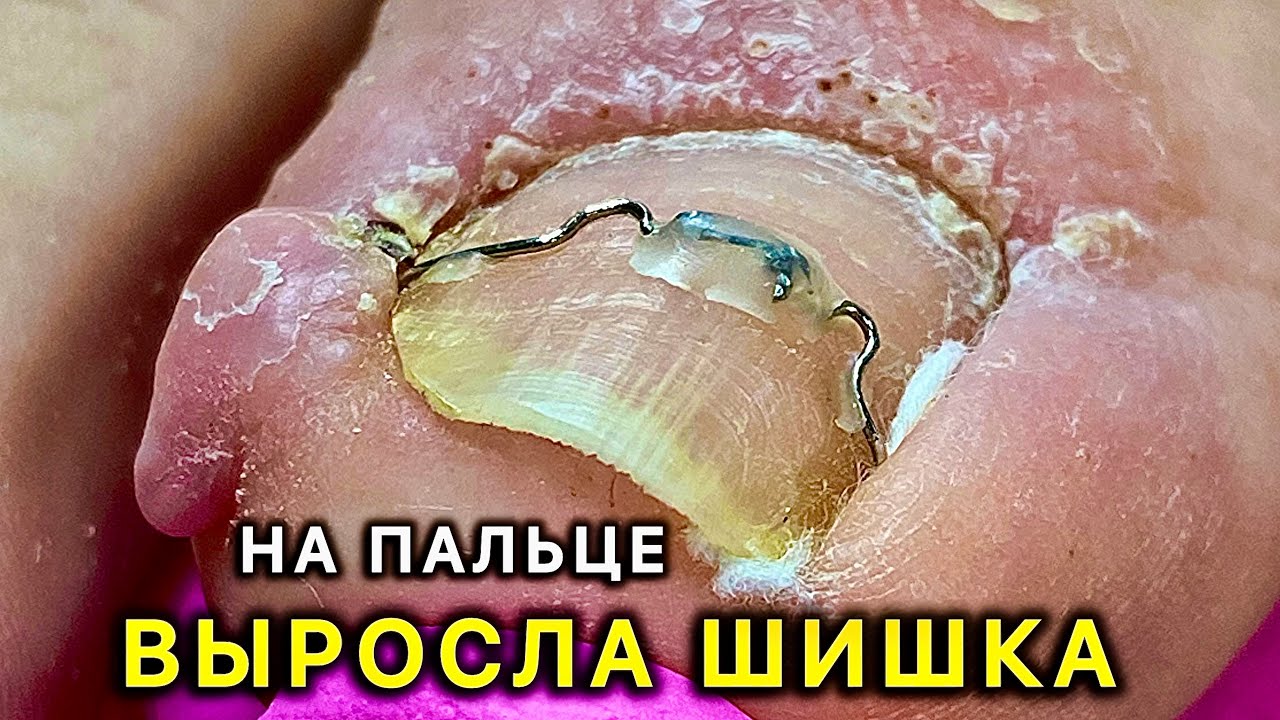
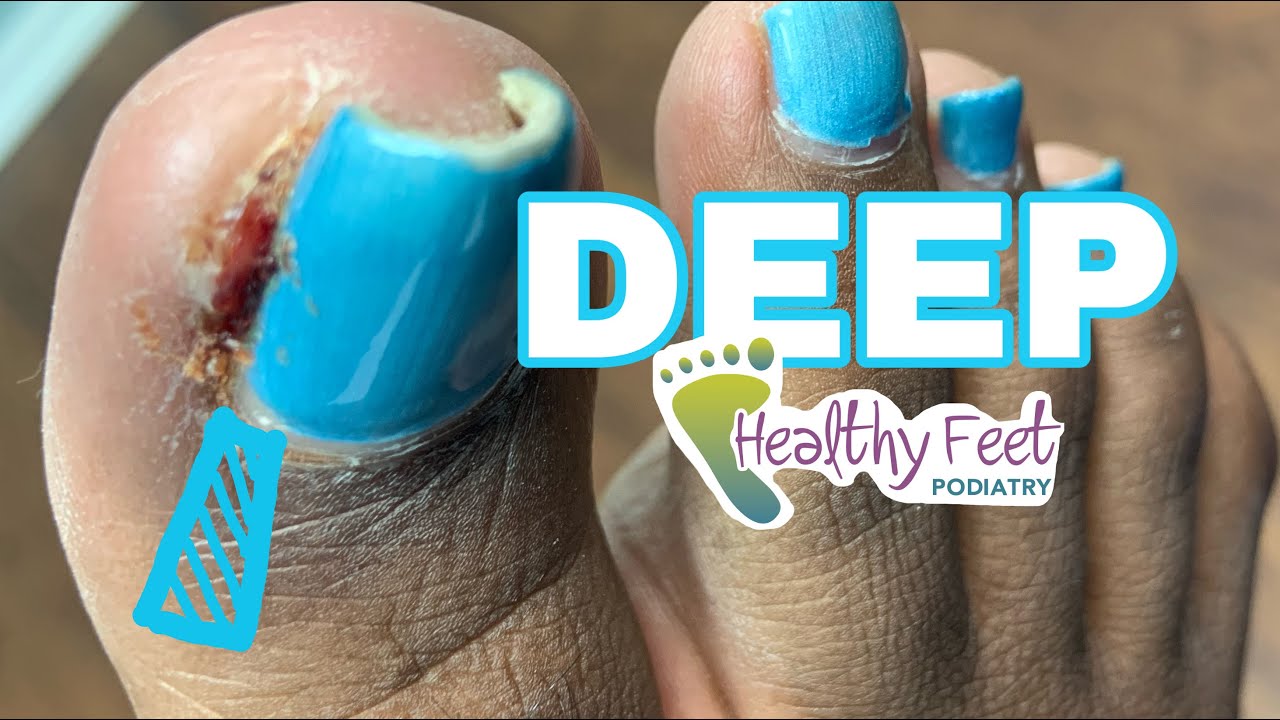
  • Ingrowing toenail (onychocryptosis)

  • Thickened toenail (onychogryphosis)

  • Severe curvature of the nail (involution)

  • Trauma to the nail (caused by e.g. fungal infection, onychomycosis)

NHS or Private? You can have the procedure under the NHS, or performed privately. The wait time to be seen on the NHS is around 18 weeks for an initial assessment, and the procedure is typically performed 4-6 weeks after that. Privately, such as with Oxfordshire Chiropody, you can be assessed within a week of your enquiry, and the procedure performed a few days later. I am currently making plans for a Straight to Surgery service, to minimise faff without compromising on quality and standards of care. 

What happens?

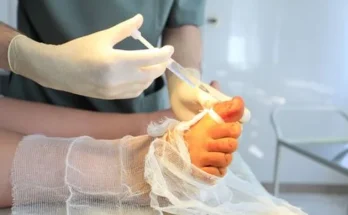
Nail surgery is performed under local anaesthetic; where only the affected toe is injected with anaesthetic and numbed. This is the horrible bit and you will feel a sting. However, you are awake throughout the surgery and you are still be able to feel your toe being moved but you will not feel any pain. The operation takes about 10 minutes however expect the appointment to last 60 minutes. The anaesthetic wears off within a couple of hours. 

Most patients tell me they feel no discomfort after the anaesthetic has worn off, but you are free to take paracetamol (as long as this is not contraindicated for you) to keep any discomfort at bay. 

There are two types of nail surgery:

  • Partial nail avulsion – removal of one or both sides of the nail affected

  • Total nail avulsion – complete removal of the affected nail

Will the nail grow back?

Once the whole of the nail or part of the nail is removed, phenol is applied to the nail bed and should ensure that the nail does not re-grow. Phenol kills off the ‘nail-making’ cells in the nail matrix. There is a very small chance the nail will regrow, despite using phenol, but this is rare (5%).

Before Nail Surgery Ideally, any soft tissue infection should have been dealt with (antibiotics) prior to surgery. This is just because an infection will change the pH of the skin and can stop the anaesthetic from working effectively. This is one reason why I always ask to see you for an initial appointment before proceeding to nail surgery. 

On the day You should eat as normal. Please arrange transport home, as you are not insured to drive whilst your toe is numb following nail surgery. A parent or guardian must accompany patients under sixteen years of age. Plan to rest with your feet up for the rest of the day. Bring a pair of open-toed sandals or a slipper with the toe area cut out.

After Nail Surgery

On returning home, rest with your foot up until the following day.

Do not remove the dressing; keep it clean and dry until your next visit (usually within 2 days of surgery). If there is oozing through the dressing, add an additional dressing on top (which will be provided on the day of surgery).

Take Paracetamol-based painkillers to ease any pain or throbbing.

Avoid walking long distances, kicking, swimming, running or jumping in the early stages of healing (first 2 weeks). 

It normally takes around 4 – 6 weeks for the toe to heal, but if you have any concerns after surgery these can be discussed at your dressing appointments.


Considerations before Nail Surgery You will be required to redress your own toe/s every other day for a minimum of 2 weeks. Can you bend down to achieve this? If not, this does not preclude you from surgery but other arrangements will need to be made, such as seeing a Practice Nurse or asking for help from a family member. If you require routine footcare anyway, and have not suffered any nasty infections second to problems with your ingrowing toenails, long-term conservative care may be a better option for you. This is a regular visit to a podiatrist, typically every 6-8 weeks to keep your feet in tip-top shape. The problematic nails can be gently and painlessly ‘resected’ at each appointment. This involves removing a sliver of nail on the oblique, so that as the nail grows, it does so away from the flesh of the toe. If you would like to know more about Nail Surgery, please get in touch

DEEPEST and LONGEST INGROWN NAIL REMOVED Read More
Unexpected drainage of an abscess on the foot

Unexpected drainage of an abscess on the foot

Abscess Drainage: Procedures, Recovery, Recurrence

A skin abscess is a pocket of pus just under the surface of an inflamed section of skin. It’s usually triggered by a bacterial infection.

Abscess drainage is the treatment typically used to clear a skin abscess of pus and start the healing process. Smaller abscesses may not need to be drained to disappear.

Read on to learn more about this procedure, the recovery time, and the likelihood of recurrence.

What is an abscess incision and drainage procedure?

Before a skin abscess drainage procedure, you may be started on a course of antibiotic therapy to help treat the infection and prevent associated infection from occurring elsewhere in the body.

The procedure is typically done on an outpatient basis. If you have a severe bacterial infection, you may need to be admitted to a hospital for additional treatment and observation.

Prior to making an incision, your doctor will clean and sterilize the affected area.

Usually, a local anesthetic is sufficient to keep you comfortable. It’s administered with a needle into the skin near the roof of the abscess where your doctor will make the incision for drainage. Examples of local anesthetics include lidocaine and bupivacaine.

The abscess drainage procedure itself is fairly simple:

  1. Your doctor makes an incision through the numbed skin over the abscess.
  2. Pus is drained out of the abscess pocket.
  3. After the pus has drained out, your doctor cleans out the pocket with a sterile saline solution.
  4. The abscess is left open but covered with a wound dressing to absorb any more pus that is produced initially after the procedure.
  5. A deeper or larger abscess may require a gauze “wick” to be placed inside to help keep the abscess open. This allows the tissue to heal properly from inside out and helps absorb pus or blood during the healing process.
  6. Your doctor may send a sample of the pus to a lab for a culture to determine the cause of the bacterial infection.

Will you need a ride home?

If it isn’t possible to use local anesthetic or the drainage will be difficult, you may need to be placed under sedation, or even general anesthesia, and treated in an operating room. In this case, you’ll need a ride home.

If a local anesthetic is enough, you may be able to drive yourself home after the procedure. If the abscess is in a location that may affect your driving, such as your right leg, you may need a ride.

What’s the recovery like?

Recovery time from abscess drainage depends on the location of the infection and its severity.

The gauze dressing on the skin over the wound incision may need to be in place for a couple of days or a week for an abscess that was especially large or deep.

If this dressing becomes soaked with drainage, it will need to be changed.

If your doctor placed gauze wick packing inside of the abscess cavity, your doctor will need to remove or repack this within a few days.

You can expect a little pus drainage for a day or two after the procedure.

Your doctor may also prescribe antibiotic therapy to help your body fight off the initial infection and prevent subsequent infections. Pain relieving medications may also be recommended for a few days.

Within a week, your doctor will remove the dressing and any inside packing to examine the wound during a follow-up appointment. If everything looks good, you may be shown how to care for the wound and change the dressing and inside packing going forward.

For the first few days after the procedure, you may want to apply a warm, dry compress (or heating pad set to “low”) over the wound three or four times per day. This can help speed up the healing process.

You may also be advised to gently clean the area with soap and warm water before putting on new dressing. However, you should check with your doctor or a nurse about home care.

Healing could take a week or two, depending on the size of the abscess. During this time, new skin will grow from the bottom of the abscess and from around the sides of the wound.

Are there other treatments that can be used to heal skin abscesses?

An abscess doesn’t always require medical treatment. Milder abscesses may drain on their own or with a variety of home remedies.

You may be able to help a small abscess start to drain by applying a hot, moist compress to the affected area. This may also help reduce swelling and start the healing.

Other treatments for mild abscesses include dabbing them with a diluted mixture of tea tree oil and coconut or olive oil.

Soaking a cloth compress in hot water and Epsom salt and applying it gently to an abscess a few times a day may also help dry it out.

Get our free anti-inflammatory recipes

We rounded up a few nutritious and anti-inflammatory recipes for you to try next time you need inspiration in the kitchen. Join our psoriasis newsletter for your free recipes and expert guidance twice a week.

Will the abscess come back?

A skin abscess, sometimes referred to as a boil, can form just about anywhere on the body. A blocked oil gland, a wound, an insect bite, or a pimple can develop into an abscess.

If the infected area of your current abscess is treated thoroughly, typically there’s no reason a new abscess will form there again.

However, if the infection wasn’t eliminated, the abscess could reform in the same spot or elsewhere. Taking all of your antibiotics exactly as prescribed can help reduce the odds of an infection lingering and continuing to cause symptoms.

An abscess can also form after treatment if you develop a methicillin-resistant Staphylococcus aureus (MRSA) infection or other bacterial infection. These infections are contagious and can be acquired in a hospital setting or through direct contact with another person who has the infection.

Your doctor will treat an MRSA abscess the same as another similar abscess — by draining it and prescribing an appropriate antibiotic.

What are the symptoms of a skin abscess?

The most obvious symptom of an abscess is a painful, compressible area of skin that may look like a large pimple or even an open sore. The skin around the abscess may look red and feel tender and warm. You may also see pus draining from the site.

Other symptoms may include:

  • swelling around the infected area
  • hardened outer layer of skin
  • fever or chills if the infection is severe
When should you see a doctor?

A small abscess with little pain, swelling, or other symptoms can be watched for a few days and treated with a warm compress to see if it recedes. You should see a doctor if the following symptoms develop:

  • The abscess grows.
  • You see pus (which is usually a sign of infection).
  • Redness and swelling forms around the sore area.
  • The area is warm to the touch.
  • You have a fever or chills.
How is a skin abscess diagnosed?

A doctor can usually diagnose a skin abscess by examining it. You should also be able to answer questions about your symptoms, such as:

  • when the abscess formed
  • whether it’s painful
  • whether you’ve had other abscesses

To identify the type of infection you have, your doctor may send pus drained from the area to a lab for analysis.

The takeaway

Abscess drainage is usually a safe and effective way of treating a bacterial infection of the skin. A doctor will numb the area around the abscess, make a small incision, and allow the pus inside to drain. This, and sometimes a course of antibiotics, is really all that’s involved.

If you follow your doctor’s advice about at-home treatment, the abscess should heal with little scarring and a lower chance of recurrence.

Unexpected drainage of an abscess on the foot Read More
blackheads elderly in ear👂

blackheads elderly in ear👂

Why Blackheads Form in Your Ears and How to Treat Them

Your ears are particularly susceptible to blackheads because they often aren’t given the same preventive treatment as your face. Treatment can include exfoliation and acne treatments.

Blackheads are one form of acne, a type of inflammatory skin condition that’s caused by clogged pores. While blackheads are commonly linked to areas of the “T-zone” (chin, nose, and forehead), they can occur anywhere.

Unlike other types of acne, such as cysts, blackheads aren’t linked to bacteria. They’re caused by a combination of oil (sebum), dead skin cells, and dirt that clog your pores and create a hardened substance. The top of the pore is left open, and the plugged material oxidizes into a darkened color.

Read on to learn how blackheads are formed and how to treat them on your ears.

What causes blackheads?

Everyone has oil glands — in fact, these are necessary for natural skin hydration. Oil glands only become problematic if they become overactive and produce too much sebum. This is most often the case in people with oily or combination skin types.

The following risk factors can also increase your number of clogged pores, leading to more blackheads:

  • hormonal fluctuations
  • prescription medications
  • stress
  • family history

Although whiteheads also stem from clogged pores, they have closed heads. This creates the white cap that you see on the skin.

What treatment options are available?

You’ll follow the same steps to get rid of a blackhead in your ear as you would for blackheads on other parts of your body. The difference, though, is that the skin on your ears is more sensitive, and you also can’t see the area easily.

Consistency is also important — it can be easy to forget your ears compared to more visible areas, such as your face.

1. Wash your ears

One of the best ways to remove the excess oils and dirt that can build up in your ears is to wash them every day. This is easy to do in the shower, and you may even be able to use your regular face cleanser. You can use your fingers or a soft washcloth.

Choose gentle foaming, oil-free products, such as:

  • Cetaphil Gentle Skin Cleanser
  • Dermalogica Special Cleansing Gel
  • Olay Clean Foaming Face Cleanser for Sensitive Skin

Avoid over-scrubbing your ears, as this can irritate your skin and cause more acne.

2. Exfoliate the area

You may already know that exfoliation is important for your face and body. It helps to remove dead skin cells that dull your skin tone and clog your pores. This also includes your ears. You can gently exfoliate the delicate skin surrounding your ears once a week. This is best to do the shower.

Apply the exfoliating wash with your fingers and rub gently. The following products may help:

  • Clarins One-Step Gentle Exfoliating Cleanser
  • Philosophy the Microdelivery Face Wash
  • Sephora Exfoliating Cleansing Cream
3. Apply acne medication

Certain over-the-counter (OTC) acne medications can also help unplug blackheads in and around your sensitive ears. Salicylic acid is a helpful OTC medication that works by unclogging pores and stripping away dead skin cells. Other acne medications like benzoyl peroxide are also useful.

Salicylic acid is available in numerous acne products. Astringents and toners are the most common, although some cleansers have it, too. When using a salicylic acid-based cleanser, such as Dermalogica Clearing Skin Wash, use this in place of a regular cleanser in the shower.

You can also use your regular cleanser and follow up with an astringent, such as Neutrogena Clear Pore Oil-Eliminating Astringent. When using an astringent, use once a day to start. If your skin doesn’t develop any irritation, you can apply twice daily in your ears with a cotton ball or Q-tip.

4. Consider extraction

Extraction may be a last resort for stubborn blackheads in the ear. Rather than using fingernails or bobby pins, you’ll want to buy an extraction tool that won’t leave marks or cuts on your skin.

Still, even professional-grade extraction tools can be difficult to use in your ears. You should:

  1. First, press a warm washcloth on the area to soften the plugged pore.
  2. Use a sterilized extractor by pressing the metal loop on the edge of the blackhead. Then, sweep it across to extract it.
  3. Be sure you don’t press the tool directly onto your blackhead — this can cause your sensitive ear skin to tear.
  4. Wash your ear and sterilize the extractor again after you’re done.
When to see your dermatologist

Although at-home blackhead removal methods can work for some people, it doesn’t work in all cases. If your blackheads come back in your ears, or if you have a widespread case throughout the area, it may be time to see your dermatologist.

A dermatologist can help with ear blackheads in a few different ways. With professional extraction tools, they can first remove the blackheads safely and thoroughly. This could be much more effective than doing the extractions yourself since you may not be able to see inside or behind your ear very well.

If you have recurring blackheads in the ears and other areas of the body, your dermatologist may prescribe acne medication. Keep in mind though that many of these products can make your skin sensitive to the sun, so be sure to wear plenty of sunscreen to avoid burns.

How to prevent future blackheads from forming

Another way to get rid of blackheads in your ear is to help prevent them in the first place. Such a task is dependent on keeping your ears clean and free of excess oil. Most of the treatments don’t treat the blackhead itself but prevent others from forming. Consider the following steps:

blackheads elderly in ear👂 Read More
Drainage of an arm abscess

Drainage of an arm abscess

Abscess Drainage: Procedures, Recovery, Recurrence

A skin abscess is a pocket of pus just under the surface of an inflamed section of skin. It’s usually triggered by a bacterial infection.

Abscess drainage is the treatment typically used to clear a skin abscess of pus and start the healing process. Smaller abscesses may not need to be drained to disappear.

Read on to learn more about this procedure, the recovery time, and the likelihood of recurrence.

What is an abscess incision and drainage procedure?

Before a skin abscess drainage procedure, you may be started on a course of antibiotic therapy to help treat the infection and prevent associated infection from occurring elsewhere in the body.

The procedure is typically done on an outpatient basis. If you have a severe bacterial infection, you may need to be admitted to a hospital for additional treatment and observation.

Prior to making an incision, your doctor will clean and sterilize the affected area.

Usually, a local anesthetic is sufficient to keep you comfortable. It’s administered with a needle into the skin near the roof of the abscess where your doctor will make the incision for drainage. Examples of local anesthetics include lidocaine and bupivacaine.

The abscess drainage procedure itself is fairly simple:

  1. Your doctor makes an incision through the numbed skin over the abscess.
  2. Pus is drained out of the abscess pocket.
  3. After the pus has drained out, your doctor cleans out the pocket with a sterile saline solution.
  4. The abscess is left open but covered with a wound dressing to absorb any more pus that is produced initially after the procedure.
  5. A deeper or larger abscess may require a gauze “wick” to be placed inside to help keep the abscess open. This allows the tissue to heal properly from inside out and helps absorb pus or blood during the healing process.
  6. Your doctor may send a sample of the pus to a lab for a culture to determine the cause of the bacterial infection.

Will you need a ride home?

If it isn’t possible to use local anesthetic or the drainage will be difficult, you may need to be placed under sedation, or even general anesthesia, and treated in an operating room. In this case, you’ll need a ride home.

If a local anesthetic is enough, you may be able to drive yourself home after the procedure. If the abscess is in a location that may affect your driving, such as your right leg, you may need a ride.

What’s the recovery like?

Recovery time from abscess drainage depends on the location of the infection and its severity.

The gauze dressing on the skin over the wound incision may need to be in place for a couple of days or a week for an abscess that was especially large or deep.

If this dressing becomes soaked with drainage, it will need to be changed.

If your doctor placed gauze wick packing inside of the abscess cavity, your doctor will need to remove or repack this within a few days.

You can expect a little pus drainage for a day or two after the procedure.

Your doctor may also prescribe antibiotic therapy to help your body fight off the initial infection and prevent subsequent infections. Pain relieving medications may also be recommended for a few days.

Within a week, your doctor will remove the dressing and any inside packing to examine the wound during a follow-up appointment. If everything looks good, you may be shown how to care for the wound and change the dressing and inside packing going forward.

For the first few days after the procedure, you may want to apply a warm, dry compress (or heating pad set to “low”) over the wound three or four times per day. This can help speed up the healing process.

You may also be advised to gently clean the area with soap and warm water before putting on new dressing. However, you should check with your doctor or a nurse about home care.

Healing could take a week or two, depending on the size of the abscess. During this time, new skin will grow from the bottom of the abscess and from around the sides of the wound.

Are there other treatments that can be used to heal skin abscesses?

An abscess doesn’t always require medical treatment. Milder abscesses may drain on their own or with a variety of home remedies.

You may be able to help a small abscess start to drain by applying a hot, moist compress to the affected area. This may also help reduce swelling and start the healing.

Other treatments for mild abscesses include dabbing them with a diluted mixture of tea tree oil and coconut or olive oil.

Soaking a cloth compress in hot water and Epsom salt and applying it gently to an abscess a few times a day may also help dry it out.

HEALTHLINE NEWSLETTER
Get our free anti-inflammatory recipes

We rounded up a few nutritious and anti-inflammatory recipes for you to try next time you need inspiration in the kitchen. Join our psoriasis newsletter for your free recipes and expert guidance twice a week.

Will the abscess come back?

A skin abscess, sometimes referred to as a boil, can form just about anywhere on the body. A blocked oil gland, a wound, an insect bite, or a pimple can develop into an abscess.

If the infected area of your current abscess is treated thoroughly, typically there’s no reason a new abscess will form there again.

However, if the infection wasn’t eliminated, the abscess could reform in the same spot or elsewhere. Taking all of your antibiotics exactly as prescribed can help reduce the odds of an infection lingering and continuing to cause symptoms.

An abscess can also form after treatment if you develop a methicillin-resistant Staphylococcus aureus (MRSA) infection or other bacterial infection. These infections are contagious and can be acquired in a hospital setting or through direct contact with another person who has the infection.

Your doctor will treat an MRSA abscess the same as another similar abscess — by draining it and prescribing an appropriate antibiotic.

What are the symptoms of a skin abscess?

The most obvious symptom of an abscess is a painful, compressible area of skin that may look like a large pimple or even an open sore. The skin around the abscess may look red and feel tender and warm. You may also see pus draining from the site.

Other symptoms may include:

  • swelling around the infected area
  • hardened outer layer of skin
  • fever or chills if the infection is severe
When should you see a doctor?

A small abscess with little pain, swelling, or other symptoms can be watched for a few days and treated with a warm compress to see if it recedes. You should see a doctor if the following symptoms develop:

  • The abscess grows.
  • You see pus (which is usually a sign of infection).
  • Redness and swelling forms around the sore area.
  • The area is warm to the touch.
  • You have a fever or chills.
How is a skin abscess diagnosed?

A doctor can usually diagnose a skin abscess by examining it. You should also be able to answer questions about your symptoms, such as:

  • when the abscess formed
  • whether it’s painful
  • whether you’ve had other abscesses

To identify the type of infection you have, your doctor may send pus drained from the area to a lab for analysis.

The takeaway

Abscess drainage is usually a safe and effective way of treating a bacterial infection of the skin. A doctor will numb the area around the abscess, make a small incision, and allow the pus inside to drain. This, and sometimes a course of antibiotics, is really all that’s involved.

If you follow your doctor’s advice about at-home treatment, the abscess should heal with little scarring and a lower chance of recurrence.

Drainage of an arm abscess Read More
Infected Cyst Removal on the Mid-Back

Infected Cyst Removal on the Mid-Back

Epidermal Inclusion Cyst (Sometimes Called Sebaceous Cyst)

An epidermal inclusion cyst (sebaceous cyst) is a fluid-filled lump under your skin. A keratin substance fills this cyst. It usually doesn’t cause symptoms. Don’t try to pop or remove an epidermal inclusion cyst. A healthcare provider will offer treatment to remove it if it causes discomfort.

Overview

What is an epidermal inclusion cyst (sebaceous cyst)?

An epidermal inclusion cyst (epidermoid cyst) is a fluid-filled pocket under the surface of your skin. It looks and feels like a lump or bump on your skin.

Many people call epidermal inclusion cysts “sebaceous cysts.” The term “sebaceous cyst” is misleading because the cyst isn’t filled with sebum. Sebum is an oily substance created by your sebaceous glands that keeps your skin moist. Instead, a keratin (protein) and cell debris substance fill epidermal inclusion cysts.

Most healthcare providers only use the term “sebaceous cysts” when associated with the skin condition known as steatocystoma multiplex. Cysts that form with this condition fill with sebum, so they’re truly “sebaceous cysts.” True sebaceous cysts aren’t common, but epidermal inclusion cysts are.

As the name implies, epidermal inclusion cysts form under the top layer of your skin (epidermis).

How common are epidermal inclusion cysts (sebaceous cysts)?

Epidermal inclusion cysts are the most common type of skin cyst.

Symptoms and Causes

What does an epidermal inclusion cyst (sebaceous cyst) look like?

An epidermal inclusion cyst may have the following features:

  • A round bump or dome-shaped lump.
  • A dark dot (punctum) in the center of the cyst.
  • The size ranges from .25 inches to greater than 2 inches. It can grow slowly.
  • Skin discoloration (usually pink to red or darker than your natural skin tone).
  • Tender or warm to the touch.
  • It can move easily.

What are epidermal inclusion cysts (sebaceous cysts) filled with?

A keratin and cell debris substance fills epidermal inclusion cysts. When drained by a dermatologist, this substance looks thick and yellow and has a foul odor.

Is an epidermal inclusion cyst (sebaceous cyst) painful?

An epidermal inclusion cyst isn’t usually painful (asymptomatic). Sometimes, the cyst can inflame (swell) and feel tender when you touch it. As the cyst grows, you may experience skin irritation and pain if it ruptures (breaks open). Occasionally you’ll experience itching at the site of an epidermal inclusion cyst. See your healthcare provider if you develop pain on or near a cyst or have other concerning symptoms.

Where do epidermal inclusion cysts (sebaceous cysts) form?

Epidermal inclusion cysts can form anywhere on your body, but they’re most common on your:

  • Face.
  • Chest.
  • Back.
  • Scalp
  • Neck.
  • Legs.
  • Arms.
  • Genitalia.

What causes an epidermal inclusion cyst (sebaceous cyst)?

Epidermal inclusion cysts form after a blockage to a hair follicle (an opening in your skin where hair grows out) at the follicular infundibulum (the top part of the hair follicle).

Your body naturally sheds skin cells when they reach the end of their life cycle. If you have a skin injury like a scratch, surgical wound or a skin condition like acne or chronic sun damage, it can disrupt the path your skin cells take to leave your body. This traps these cells and other components like keratin, so they collect under the surface of your skin. This is how a cyst forms.

On areas of your body where you don’t have hair follicles, a cyst can form after an injury or trauma to your skin, too. The injury pushes your skin cells below the top layer of your skin into the second layer (dermis). This creates a pocket where keratin collects and forms a cyst.

What are the risk factors for epidermal inclusion cysts (sebaceous cysts)?

Although they can appear at any age, epidermal inclusion cysts most frequently occur between ages 20 to 60. Epidermal inclusion cysts rarely appear before puberty. They’re more common among people assigned male at birth (AMAB) than people assigned female at birth (AFAB).

Some rare genetic conditions and other conditions lead to the development of multiple epidermal inclusion cysts:

  • Gardner syndrome (familial adenomatous polyposis).
  • Gorlin syndrome (basal cell nevus syndrome).
  • Favre-Racouchot syndrome.
  • Human papillomavirus (HPV).

Certain medications may increase your risk of developing epidermal inclusion cysts, including:

  • BRAF inhibitors.
  • Imiquimod.
  • Cyclosporine.

Is an epidermal inclusion cyst (sebaceous cyst) contagious?

No, epidermal inclusion cysts aren’t contagious.

What are the complications of an epidermal inclusion cyst (sebaceous cyst)?

Complications of an epidermal inclusion cysts may include:

  • Inflamed epidermal inclusion cyst: The cyst is swollen and tender.
  • Infected epidermal inclusion cyst: Your body is fighting harmful bacteria within the cyst, which causes swelling, pain and skin discoloration.
  • Ruptured epidermal inclusion cyst: The cyst breaks open, which causes swelling, pain, skin discoloration and yellow (often stinky) fluid drainage.

Is an epidermal inclusion cyst a sign of cancer?

Epidermal inclusion cysts are rarely harmful. However, researchers found rare cases where malignancy (cancer) formed within the cyst, specifically:

  • Squamous cell carcinoma.
  • Basal cell carcinoma.

An epidermal inclusion cyst may be concerning if it has any of the following characteristics:

  • Signs of infection, including pain, skin discoloration, swelling and/or drainage.
  • A fast rate of growth.
  • A diameter larger than 5 centimeters.

Talk to your healthcare provider if you notice changes to your skin.

Diagnosis and Tests

How is an epidermal inclusion cyst (sebaceous cyst) diagnosed?

A healthcare provider can diagnose an epidermal inclusion cyst during a physical exam simply by looking at it and learning more about your symptoms if you have any.

Although not usually necessary, testing can confirm a diagnosis. It may include:

  • Epidermal inclusion cyst radiology or imaging tests: An ultrasound may help determine the contents of the cyst. A CT scan (computed tomography scan) can confirm the diagnosis of a large epidermal inclusion cyst and help your provider determine the best plan for removal.
  • A punch biopsy: A provider will remove a small amount of the tissue from the cyst to examine it.

Should I see a specialist for an epidermal inclusion cyst?

If you notice changes to your skin, contact a healthcare provider. You might start with a primary care physician (PCP), and they can refer you to see a dermatologist or a doctor who specializes in skin conditions. Only certain providers can remove epidermal inclusion cysts. Your provider may refer you to a specialist trained to remove cysts, such as a dermatologist, general surgeon or plastic surgeon.

Management and Treatment

How is an epidermal inclusion cyst (sebaceous cyst) treated?

In many cases, a healthcare provider may recommend monitoring the epidermal inclusion cyst and not treating it if it doesn’t cause symptoms.

If the cyst swells and/or causes discomfort, use a warm compress over the cyst to reduce symptoms at home. If your symptoms continue or get worse, contact a provider. They may recommend removing it or they’ll inject a steroid medication into the cyst to temporarily reduce swelling.

Antibiotics can treat an inflamed or infected epidermal inclusion cyst.

Epidermal inclusion cyst (sebaceous cyst) removal

Your provider may remove the epidermal inclusion cyst with the following procedures:

  • Incision and drainage: Your provider will make a small opening over the cyst and release the collection of fluid within the cyst. This procedure won’t resolve the cyst since your provider won’t remove the cyst capsule (the outer portion of the cyst). This can help with inflammation and swelling.
  • Surgical excision: A surgical procedure that removes the cyst. This procedure uses a local anesthetic (you won’t be asleep and you won’t feel pain). The removal of the capsule (the outer portion of the cyst) prevents the cyst from growing back.

Don’t try popping or draining the cyst yourself. This could cause an infection, and the cyst will likely grow back (recur).

Are there side effects of the treatment?

Risks of surgical excision of a cyst are rare but may include:

  • Infection.
  • Bleeding.
  • Scars.
  • Pain.
  • Recurrence.

Prevention

Can an epidermal inclusion cyst (sebaceous cyst) be prevented?

Epidermal inclusion cysts typically form randomly. However, avoiding injury or trauma to your skin and treating skin conditions may be helpful to reduce your risk.

Outlook / Prognosis

What’s the outlook for an epidermal inclusion cyst (sebaceous cyst)?

Once you have a diagnosis, you can wait and see if the cyst improves on its own or discuss treatment options with your healthcare provider.

Most cysts don’t cause symptoms. But, it can be challenging if your cyst forms on a very visible part of your body, like on your face or scalp, or if it causes pain. Talk to a healthcare provider about cyst removal if the cyst is bothersome.

Does an epidermal inclusion cyst (sebaceous cyst) go away?

Some cysts decrease in size, while others continue to grow until you get treatment. Without treatment, you may have the cyst for the rest of your life.

Can epidermal inclusion cysts get worse?

Epidermal inclusion cysts sometimes remain small in size and asymptomatic for several years. However, they can also increase in size and may become uncomfortable or irritated. If the cyst bothers you, discuss treatment options with your healthcare provider.

Living With

When should I see a healthcare provider?

Always see your healthcare provider if you find a lump on your skin. It might be an epidermal inclusion cyst, another type of cyst or something else. Don’t try to diagnose it yourself. See your healthcare provider for a clear diagnosis and specialized treatment.

What questions should I ask my healthcare provider?

You may want to ask your provider:

  • Do I have an epidermal inclusion cyst or another type of cyst?
  • Will this go away on its own, or will it need treatment?
  • Do you think the epidermal inclusion cyst will get bigger?
  • What treatment options do you recommend?
  • Do I need to see a specialist or a surgeon?
  • What should I do if the cyst comes back after the procedure?

Additional Common Questions

Is an epidermal inclusion cyst (sebaceous cyst) dangerous?

Most epidermal inclusion cysts aren’t dangerous. They’re usually asymptomatic. Not all epidermal inclusion cysts become infected, but infection is possible. Infections can be dangerous if left untreated. While very rare, some cysts can turn into cancer, so contact a healthcare provider if you notice changes to your skin.

A note from Cleveland Clinic

You may feel scared or anxious after finding a new lump or bump on your skin. The lump may be a harmless epidermal inclusion cyst or it may be a more serious diagnosis. Contact your healthcare provider as soon as you notice changes to your skin. They’ll give you an official diagnosis and answer any questions or concerns you have.

Treatment isn’t always necessary with epidermal inclusion cysts, but you may feel more comfortable if a provider removes it. Don’t try popping or draining the cyst at home. This could lead to an infection. Your healthcare provider will drain the cyst safely, so you don’t have to worry.

Infected Cyst Removal on the Mid-Back Read More
Deafness CURED After Earwax Removal

Deafness CURED After Earwax Removal

How to Safely Remove Ear Wax Blockage at Home

Key takeaways:

  • Earwax is naturally made by the body to protect the ears. But too much earwax can lead to hearing changes and discomfort.

  • Safe home remedies for earwax removal include ear drops and irrigation. Don’t use instruments or objects to remove earwax.

  • If you have ear pain, drainage, or hearing loss, see a healthcare provider.

A man uses a solution to clean his earwax. There are several at-home remedies that can help remove earwax, such as ear irrigation and earwax removal drops.
Nes/E+ via Getty Images Plus

If you’ve ever had uncomfortable ear fullness or dulled hearing, then you’re probably already familiar with cerumen impaction — or, to put it simply, an earwax blockage.

Too much earwax can lead to an annoying blockage. If you’re prone to earwax blockages, then you probably are looking for some ways to easily remove earwax at home.

There are easy and safe ways you can remove any extra earwax. But there are also some options you want to avoid. Let’s take a look at home remedies that can help you safely remove earwax.

Search and compare options

Search is powered by a third party. By clicking a topic in the advertisement above, you agree that you will visit a landing page with search results generated by a third party, and that your personal identifiers and engagement on this page and the landing page may be shared with such third party. GoodRx may receive compensation in relation to your search.
What is earwax?

Earwax, also known as cerumen, is a substance that the body naturally makes on a regular basis.

Skin cells inside the ear are constantly turning over to provide new, fresh skin. But, unlike skin on other parts of the body, the ear canal provides little room for dead cells to go. So, to prevent dead skin cells from clogging up the ear, glands inside the ear make oily substance to help trap dead skin cells. This creates earwax.

Earwax is actually very helpful, as it helps moisturize the ears. It also protects the ears by blocking bacteria, fungus, and other substances from entering the inner parts of the ear.

In most cases, ear wax doesn’t need to be removed.  Experts at the American Academy of Otolaryngology-Head and Neck Surgery recommend that people don’t try to remove earwax that’s not causing any symptoms. Earwax is protective, and continuing to remove it can possibly lead to more problems, such as infection. This can even increase the risk of a clogged ear in the future.

But when wax starts to pile up, it can be a problem. Too much wax can lead to discomfort, temporary hearing loss, and sometimes even an ear infection.

GoodRx icon
  • Need help finding the right ear wax drops? Here’s 6 over the counter options that can free you from earwax.

  • Wondering why you have so much earwax build up? Learn about the most common causes of earwax buildup.

  • Are your ears ringing? It could be earwax but here’s other reasons your ears could be ringing.

What causes an earwax blockage?

Normally earwax moves out of the ear when people move their jaw. This happens a little at a time so you don’t usually notice it.

But sometimes this doesn’t work the way it should and wax sits in the ear too long, becoming dry and hard. This leads to stuck earwax — also called an earwax impaction.  This is more common in people who wear hearing aids. Hearing aids can block movement of wax out of the ear.  Children and older adults are at higher risk for developing earwax impactions. But it can happen to anyone.

Stuck earwax can cause symptoms like:

  • Muffled hearing

  • Ringing in the ears

  • Ear fullness or discomfort

  • Ear itching

What are some home remedies that help remove earwax?

If you’re prone to earwax impactions, you probably want a few tips to remove earwax quickly and easily at home. There are some safe and effective ways to do this at home.

At-home earwax treatments include ear drops, sprays, or irrigation solutions.

Ear drops or irrigation should never cause pain. If you try these earwax removal home remedies and experience pain, contact your healthcare provider immediately.

Ear irrigation

Irrigation with warm saline or sterile water can be a good first step toward at-home earwax removal. Here’s how you do it:

  1. Fill a small (5 mL to 10 mL) syringe full of saline or sterile water. Always use sterile water, never use tap water as it can increase the risk for serious infections. You want the liquid to be room or body temperature. Putting liquid that’s cool or cold into your ear can lead to unpleasant side effects like nausea, dizziness, and vertigo.

  2. While keeping your head upright and a towel or bin under your ear, slowly squirt the fluid upwards toward the wax collection. Try not to squirt the water directly at your eardrum, as this may damage the eardrum. Also avoid irrigating too fast, as this can cause ear pain, or even bleeding.

  3. Tilt your head sideways to remove the water or saline.

Earwax softeners

Sometimes, the earwax needs to be softened a little with earwax removal drops or sprays. These can be used alone or with irrigation for earwax removal at home. Once the earwax is softened, the body can often remove the wax on its own, no irrigation needed.

Earwax softeners are available over the counter or you can make your own. Popular options include:

  1. Carbamide peroxide: Carbamide peroxide drops are available over the counter. You can place 5 to 10 drops in the affected ear twice per day for up to 7 days.

  2. Baking soda solution: A baking soda solution can also help soften wax. You can make it on your own using 1 part sterile water and 1 part baking soda. Fill a small syringe with the solution and place 5 drops in your ear once a day.

  3. Hydrogen peroxide 3% solution: You can buy this solution at any drugstore. To soften wax, fill a small syringe with the solution and place 5 to 10 drops in your ear canal 15 to 30 minutes before irrigating.

  4. Mineral or baby oil: These are available over the counter. Experts recommend placing 3 drops into the affected ear at bedtime for 3 or 4 days. Other oils like olive oil and camphor oil also appear to be safe to use. Or you can try products containing arachis oil (peanut oil) or almond oil, as long as you do not have a nut allergy.

  5. Liquid docusate sodium: Docusate sodium is a medication that’s meant for constipation, but it can also be used to help soften earwax. Experts recommend putting 1 mL into the affected ear 15 minutes before irrigation.

What options aren’t safe to use for at-home earwax removal?

Next let’s look at home remedies for earwax removal that are best to avoid.

Cotton swabs

It may be tempting, but don’t try to dig out your earwax using cotton tipped swabs (like Q-Tips). Many people injure or rupture their eardrums trying to dig out their earwax.

Plus these items can push earwax deeper into your ear canal making it harder to get out. And deeper earwax is also more likely to touch your eardrum and cause hearing changes and pain.

Hair pins or paper clips

Healthcare providers sometimes caution patients, “Don’t put anything smaller than your elbow in your ear!” In addition to driving wax deeper into the ear, objects like hair pins or paper clips can damage the skin lining the ear canal and bring in harmful bacteria. That may lead to an infection of the outer ear, called otitis externa.

Ear candles

Ear candles are long, hollow candles that are inserted into the ear canal. The end sticking out of the ear is then lit. As you might imagine, people using ear candles can burn themselves. And ear candles may plug the ear with candle wax or rupture the eardrum.

When should you see a healthcare provider for earwax removal?

Not everyone should try to remove their earwax at home. You should see a healthcare provider before trying to remove wax if you have had trauma to the ear or any of these symptoms:

  • Fever

  • Ear drainage

  • Severe ear pain

  • Hearing loss

  • Ear ringing

These can be symptoms of an outer ear infection or inner ear infection.

People with medical conditions that increase their risk for bleeding or infection should see a healthcare provider for earwax removal. These conditions include:

  • Bleeding disorders like hemophilia

  • Liver disease

  • Low platelet counts

  • Weakened immune systems

  • A history of ear surgery

People who take blood thinners like coumadinclopidogrel, or novel anticoagulants like rivaroxaban should also see a healthcare provider for earwax removal.

Experts also advise against at-home earwax removal in young children.

Can you prevent earwax from building up over time?

Yes. One of the best things you can do to prevent earwax buildup is to avoid overcleaning. In this case, you may have a higher risk of a clogged ear in the future. So unless that earwax is really bothering you, leave it be and let your body remove it naturally.

And most importantly, avoid putting any objects into the ear, including cotton swabs, hair pins, or ear candles. These can not only damage the ear, but they can also worsen the problem by pushing more wax deeper into the canal.

The bottom line

Earwax is a natural way the body protects the eardrum from viruses, bacteria, and other toxins in the environment. Yet sometimes, too much can build up and become a problem. Usually, softening the wax and irrigating the ear at home will get extra wax out. But, don’t hesitate to see your healthcare provider when you have any concerning symptoms, such as pain, drainage, or hearing loss.

Deafness CURED After Earwax Removal Read More
Ear Wax Removal, Dead Skin & Debris Extraction from Mastoidectomy Ear

Ear Wax Removal, Dead Skin & Debris Extraction from Mastoidectomy Ear

Dealing With Earwax (Cerumen)

Why Do Ears Make Wax?

Earwax is made in the outer ear canal, the area between the fleshy part of the ear on the outside of the head and the middle ear. The medical term for earwax is cerumen (seh-ROO-mun).

Earwax has some important jobs. It:

  • acts as a waterproof lining of the ear canal, protecting it and the eardrum from germs that can cause infection
  • traps dirt, dust, and other particles, keeping them from injuring or irritating the eardrum

The wax makes its way through the outer ear canal to the opening of the ear. Then it either falls out or comes out during bathing. In most people, the outer ear canal makes earwax all the time, so the canal always has enough wax in it.


Does Earwax Need to Be Removed?

Usually, there’s no need to remove earwax because it comes out by itself. Sticking anything into a child’s ears raises the risk of infection or damage to the ear canal or eardrum. Cotton swabs are handy for a variety of grooming needs, but should not be used to remove earwax. In most cases, regular bathing is enough to keep it at healthy levels.

While some people have more earwax than others, in general the ear makes as much wax as it needs. Rarely, kids’ ears do make too much earwax. And sometimes earwax can build up and block the ear canal, especially when pushed in by a finger, cotton swab, or other object. This is called “impaction.” If it affects hearing or causes pain or discomfort, a doctor can remove it.

Parents — and kids — shouldn’t attempt to remove earwax at home, even with remedies that promise to be safe and effective. Doing so risks damage to the ear canal and, possibly, a child’s hearing.

What Can Parents Do?

If your child complains of ear discomfort and you see earwax in the ear, it’s OK to wipe the outside of the ear with a washcloth. But don’t use a cotton swab, a finger, or anything else to poke inside the ear. It could damage the delicate ear canal and eardrum, or pack the wax in even further.

Check with your doctor before using an over-the-counter earwax removal treatment.

When Should I Call the Doctor?

Call the doctor if your child has:

  • ear pain, itchiness, or discomfort (like a blocked feeling in the ears)
  • hearing problems

In infants and toddlers, tugging at the ears can be sign of an ear problem.

Sometimes doctors will remove earwax:

  • if it’s painful, itchy, or uncomfortable
  • if affects hearing
  • to get a better view of the eardrum to check for problems

Earwax removal usually is done in the doctor’s office. There might be a little discomfort but it isn’t painful. If a child can’t sit still or cooperate, the doctor can remove it in an operating room while the child is under general anesthesia.

Doctors can remove earwax in different ways, including:

  • scooping it out, pulling it out, or suctioning it out with special instruments designed for this purpose
  • flushing it out with warm water. Sometimes a doctor will put drops into the ear canal to soften the wax and break it down. Or they might ask you to do this at home and then return to the doctor for wax removal.

Removal takes only a few minutes. If there’s a sign of infection, the doctor may prescribe antibiotic ear drops.

What Else Should I Know?

Ear candling has gained a lot of attention as a home remedy for earwax removal. But it hasn’t been proved to be safe or effective, and can be dangerous.

In ear candling, one end of a cone-type device is inserted into the ear canal and the other end is set on fire. The idea is that the fire and the cone form a vacuum and extract the wax. But trying this at home carries a high risk of:

  • burning the ear canal
  • punching a hole in the eardrum, which can cause permanent hearing damage

Whenever you have any concerns about your child’s ears or hearing, call your doctor.

Ear Wax Removal, Dead Skin & Debris Extraction from Mastoidectomy Ear Read More
Epic Earwax Removal: Scooping Out a Huge Plug!

Epic Earwax Removal: Scooping Out a Huge Plug!

Swimmer’s ear: What you need to know

Swimmer’s ear is an infection that can occur after spending a long time in the water or outdoors in the wind and rain. It affects the skin that covers the outer ear canal, which leads to the eardrum.

Despite the name, swimmer’s ear is more common in people who are not swimmers, according to the University of Iowa. Individuals who spend a lot of time outdoors, such as farmers, often get the infection.

The medical name for swimmer’s ear is acute diffuse external otitis.

Bacteria can accumulate in the water. While swimming, in areas of fresh water, for example, some can enter the ear and remain for a long time, especially if the water becomes trapped by wax.

The ear has ways of protecting itself from infection, but these work best when the area is dry. If the ear is damp, bacteria can thrive, resulting in infection.

Fungal infections can also occur in the ear. However, in 98 percent of cases in North America, swimmer’s ear results from exposure to bacteria.

According to the Centers for Disease Control and Prevention (CDC), swimmer’s ear is responsible for 2.4 millionTrusted Source healthcare visits in the United States each year.

In most cases, a doctor can easily treat the infection, and receiving treatment early can prevent complications.

Symptoms

There are three types of external otitis.

Swimmer’s ear (acute diffuse external otitis)

Swimmer's ear is an infectionShare on Pinterest
Swimmer’s ear is an infection that can happen if water becomes trapped in the ear.

This is the most common type of external otitis. It can last for up to 3 weeks, and it affects the entire ear canal.

A rash can extend to the outer ear and the eardrum.

Signs and symptoms include:

  • redness and swelling in the outer ear and ear canal
  • pain in the area
  • scaly skin, which may peel off, in and around the ear canal
  • watery or pus-like discharge, which may smell bad
  • itching and irritation in and around the ear canal
  • tenderness when moving the ear or jaw
  • sore and swollen lymph nodes, or “glands,” in the throat
  • some hearing loss, if the swelling inside the ear is significant

Other types of external otitis

Acute localized external otitis occurs when a hair follicle in the ear becomes infected. A painful, pus-filled bump, called a furuncle, may form in the ear canal. This infection is a type of furunculosis.

Chronic external otitis can result from infection, allergies, or a skin condition, such as eczema. To warrant the diagnosis, the symptoms must persist for at least 3 months, and they can last for years.

Causes

The ear has several ways of protecting itself from infection.

Cerumen, or earwax, is produced by glands in the ear canal, and it performs several functions.

For example, earwax:

  • forms a thin, waterproof film on the skin of the ear canal
  • contains acids and antibacterial properties, which combat bacteria
  • collects debris, dead skin, and dirt and transports them out of the ear, where they appear as a waxy clump at the opening of the ear canal

The shape of the ear canal is also important. It slopes downward from the middle to the outer ear, so that liquid can drain.

External otitis can develop when the ear canal’s defenses cannot cope with an infection or an allergic reaction.

Risk factors
Ear painShare on Pinterest
Not only swimmers have this type of ear infection. Working outdoors is one risk factor.

The following factors increase the likelihood of contracting swimmer’s ear:

  • swimming, especially in water with high levels of bacteria
  • cleaning, prodding, scratching, or scraping the ear canal with a cotton swab
  • wearing a swim cap, using a hearing aid, or having a lot of earwax, which can trap water inside the ear
  • having a skin condition, such as eczema, acne, or psoriasis
  • having a small ear canal

Children are especially vulnerable to swimmer’s ear.

Not only swimmers get swimmer’s ear, however. It commonly affects farmers and other people who spend a lot of time outdoors.

Diagnosis

The doctor will examine the ear canal using a handheld device called an otoscope.

They will check for:

  • redness
  • inflammation
  • flaky or scaly skin
  • damage to the eardrum

They will also ask about a person’s:

  • medical history
  • symptoms
  • recent experiences, including swimming and inserting things into the ear, such as cotton swabs

If there is a blockage, the doctor may use an ear curette, a tiny instrument designed for scraping away debris, or a suction device to clear the ear canal.

If there is damage to the eardrum, the doctor will refer the patient to an ear, nose, and throat specialist, who will check whether the infection originated in the middle ear.

If symptoms do not improve, the doctor may test a sample of debris or discharge to learn more about the underlying issue.

If a person aged over 50 years sees a doctor with ear pain, the doctor may wish to rule out malignancy or temporal arteritis, a condition in which arteries become damaged or inflamed.

Treatment
EardropsShare on Pinterest
A doctor may prescribe eardrops to treat an infection.

Treatment for swimmer’s ear is usually straightforward.

Options include:

Painkillers: Acetaminophen (Tylenol), for example, can relieve discomfort.

Ear drops: The recommended drops usually contain an astringent or acidic acid, a corticosteroid, an antibiotic medication, an antifungal preparation, or a combination.

Microsuction: A specialist may use suction to clean the ear, making the drops more effective.

Ear wick: This is a soft cotton gauze plug covered with medication, and a doctor will insert it into the ear canal. The aim is to help medicine to enter the area. A person should replace the ear wick every 2 or 3 days.

Treatment for other types of external otitis

Chronic external otitis: If the underlying problem is an allergy or skin issue, a physician will treat this condition first.

They may instruct a person to use ear drops for 7 days, as well as a spray. The spray will contain acetic acid, and the drops will contain a corticosteroid. If this does not work, antifungal ear drops can help.

Acute localized external otitis: The pus-filled bump will often burst and heal in a few days without treatment.

If symptoms persist for longer than 1 week, a doctor may prescribe antibiotics. If there is severe pain, the doctor may drain the pimple to remove the pus. Painkillers can also help.

Tips

The following strategies can help a person to treat all types of external otitis.

Keeping the ear dry: Use a shower cap when bathing, and avoid swimming until the infection has healed.

Removing any discharge and debris gently: Under a doctor’s supervision, use cotton wool to clear the outer ear only, without prodding deeply.

Using a warm compress: Place a warm towel over the ear to help relieve pain.

Removing any devices: Earplugs, earrings, and hearing aids can aggravate symptoms and cause an allergic reaction.

Checking for side effects: Ear drops containing neomycin or propylene glycol can trigger allergic reactions.


Complications

External otitis is not usually serious. When a person receives treatment, complications are rare.

Without treatment, however, the infection can enter the deep tissue, causing more serious complications, including:

  • An abscess: A pus-filled growth can develop in or around the affected ear.
  • Cellulitis: This skin infection occurs when bacteria enter the deep layers of skin.
  • Stenosis: This can occur when thick, dry skin accumulates in the ear canal, narrowing it, and potentially leading to hearing loss.
  • Otomycosis: This fungal infection can develop as a complication of external otitis.

Malignant external otitis, or necrotizing external otitis

If the infection reaches the bone and cartilage of the outer ear, it can cause inflammation and damage that extends to the lower part of the skull.

The condition is very painful, and it can be life-threatening. Those most at risk are adults with weakened immune systems.

If the infection spreads to the eardrum, a buildup of pus can cause inflammation in the area and perforate the eardrum.

This will normally heal within 2 months. A doctor may prescribe oral antibiotics, and it is important to keep the ear dry.

Prevention

To prevent ear infections, avoid swimming in polluted water and keep the ears as dry as possible.

To dry the ears after swimming, the Merck Manual suggests mixing a solution of equal parts rubbing alcohol and white vinegar and putting two drops in each ear after swimming.

The alcohol will evaporate any water trapped in the ear, while the vinegar changes the ear’s pH, preventing the bacteria from growing.

Other ways of preventing infection include:

  • drying the outer ear with cotton wool or a towel
  • tipping the headTrusted Source with the ear pointed downward and pulling the earlobes in different directions or shaking the head to remove trapped water
  • drying the ears with a hairdryer on a low setting, held at least 1 foot from the ear
  • wearing well-fitting earplugs or a swim cap that covers the ears
  • rinsing the ears with clean water after swimming in a chlorinated pool

Never put cotton swabs or other foreign objects such as hairpins into the ear. This can cause further damage and force unwanted material deeper inside the ear canal.

Earwax naturally flows outward, so a person should only use cotton swabs to remove it from the outer ear. A healthcare professional should treat any wax buildup inside the ear.

Products such as hair sprays or dyes can irritate the ear, increasing the risk of external otitis. To prevent this, gently place cotton balls in the ears before applying the products. Be careful not to push the cotton balls into the ear canal.

After treatment for an ear infection, a physician will tell a person when they can safely swim again.

Epic Earwax Removal: Scooping Out a Huge Plug! Read More
Epic Ear Wax Extraction: David vs. Goliath (Tiny Canal Edition!)

Epic Ear Wax Extraction: David vs. Goliath (Tiny Canal Edition!)

Dealing With Earwax (Cerumen)

Why Do Ears Make Wax?

Earwax is made in the outer ear canal, the area between the fleshy part of the ear on the outside of the head and the middle ear. The medical term for earwax is cerumen (seh-ROO-mun).

Earwax has some important jobs. It:

  • acts as a waterproof lining of the ear canal, protecting it and the eardrum from germs that can cause infection
  • traps dirt, dust, and other particles, keeping them from injuring or irritating the eardrum

The wax makes its way through the outer ear canal to the opening of the ear. Then it either falls out or comes out during bathing. In most people, the outer ear canal makes earwax all the time, so the canal always has enough wax in it.

Does Earwax Need to Be Removed?

Usually, there’s no need to remove earwax because it comes out by itself. Sticking anything into a child’s ears raises the risk of infection or damage to the ear canal or eardrum. Cotton swabs are handy for a variety of grooming needs, but should not be used to remove earwax. In most cases, regular bathing is enough to keep it at healthy levels.

While some people have more earwax than others, in general the ear makes as much wax as it needs. Rarely, kids’ ears do make too much earwax. And sometimes earwax can build up and block the ear canal, especially when pushed in by a finger, cotton swab, or other object. This is called “impaction.” If it affects hearing or causes pain or discomfort, a doctor can remove it.

Parents — and kids — shouldn’t attempt to remove earwax at home, even with remedies that promise to be safe and effective. Doing so risks damage to the ear canal and, possibly, a child’s hearing.

What Can Parents Do?

If your child complains of ear discomfort and you see earwax in the ear, it’s OK to wipe the outside of the ear with a washcloth. But don’t use a cotton swab, a finger, or anything else to poke inside the ear. It could damage the delicate ear canal and eardrum, or pack the wax in even further.

Check with your doctor before using an over-the-counter earwax removal treatment.

When Should I Call the Doctor?

Call the doctor if your child has:

  • ear pain, itchiness, or discomfort (like a blocked feeling in the ears)
  • hearing problems

In infants and toddlers, tugging at the ears can be sign of an ear problem.

Sometimes doctors will remove earwax:

  • if it’s painful, itchy, or uncomfortable
  • if affects hearing
  • to get a better view of the eardrum to check for problems

Earwax removal usually is done in the doctor’s office. There might be a little discomfort but it isn’t painful. If a child can’t sit still or cooperate, the doctor can remove it in an operating room while the child is under general anesthesia.

Doctors can remove earwax in different ways, including:

  • scooping it out, pulling it out, or suctioning it out with special instruments designed for this purpose
  • flushing it out with warm water. Sometimes a doctor will put drops into the ear canal to soften the wax and break it down. Or they might ask you to do this at home and then return to the doctor for wax removal.

Removal takes only a few minutes. If there’s a sign of infection, the doctor may prescribe antibiotic ear drops.

What Else Should I Know?

Ear candling has gained a lot of attention as a home remedy for earwax removal. But it hasn’t been proved to be safe or effective, and can be dangerous.

In ear candling, one end of a cone-type device is inserted into the ear canal and the other end is set on fire. The idea is that the fire and the cone form a vacuum and extract the wax. But trying this at home carries a high risk of:

  • burning the ear canal
  • punching a hole in the eardrum, which can cause permanent hearing damage

Whenever you have any concerns about your child’s ears or hearing, call your doctor.

Medically reviewed by: Patrick C. Barth, MD
———-

How to get earwax out of your ear

We include products we think are useful for our readers. If you buy through links on this page, we may earn a small commission. Here’s our process.

How we vet brands and products

People should not poke anything into the ear to remove earwax, but gently dripping hydrogen peroxide, ear drops, or baby oil into the ear will soften the wax, which may cause it to come out.

Earwax, also called cerumen, serves an essential function in the body. It helps remove dead skin cells, dirt, hair, and other debris from the ear canal. It lowers the risk of infection and prevents the ear canal from feeling uncomfortable and itchy. It also helps reduce the irritation that water causes when it enters the ear canal.

However, it is possible for the body to overproduce earwax, allowing it to build up and block the ear canal.

A blockage can occur if a person cleans their ears using a cotton swab, which can push the earwax further into the ear canal. This may also happen if a person is using a hearing aid.

The medical term for an earwax blockage is a “cerumen impaction.” People can usually treat this condition at home using simple household products.

Treatments and home remedies

There are several ways to deal with an earwax blockage at home, including:

Hydrogen peroxide

A common method for earwax removal is to add a few drops of hydrogen peroxide to a damp cotton ball and apply it to the affected ear. Hydrogen peroxide is a commonTrusted Source antiseptic. A person can also use a clean eyedropper to drip the solution into the ear canal.

It is essential to tilt the head so that the affected ear is pointing upward for several minutes. This will allow the fluid to drip down into the ear canal to reach the blockage.

After a few minutes, tilting the head the other way will allow the fluid and earwax to drain until the ear canal is clear.

In one article, researchers noted that a person should apply hydrogen peroxide to the earwax about 30 minutesTrusted Source prior to ear irrigation. The solution can loosen up the earwax to make removal with water irrigation easier.

A person should use some caution when using pure solutions of hydrogen peroxide or drops made with the solution. At low concentrations typically found in readily available household products, hydrogen peroxide can cause skin irritation. At concentrations of 10% or higher, it can cause burns on the skin.

If irritation occurs, a person should discontinue use and talk with their doctor if their symptoms get worse.

A person should use hydrogen peroxide only if their eardrum is intact. If it is perforated or a person has had ear tubes inserted, this will cause pain.

Rubber ball syringe

A similar method is to use a rubber ball syringe with warm water. A person should have the affected ear pointing upward and use the syringe to drip warm water slowly into the ear canal.

It is vital to avoid forcefully flushing the water into the ear canal, as this can cause dizziness. The water must not be too hot or too cold.

After a minute, the person should tilt their head the other way so that the fluid and earwax can drip out. They may find that pulling up slightly on their ear may help with allowing the water to drain out.

It may be necessary to repeat this process multiple times. Anyone who has an ear injury, such as a ruptured eardrum, should not use this method. People who frequently get swimmer’s ear should not use this method.

Ear drops

It is possible to purchase ear drops over the counter (OTC) or online to treat an earwax blockage. These are usually water- or oil-based solutions that soften the earwax. They often contain carbamide peroxide, which is similar to hydrogen peroxide.

To use an OTC solution, people should follow the instructions on the packaging. Usually, they will need to apply between 5 to 10 drops of the solution to the affected ear twice per day for several days until the ear canal is clear.

If the ear drops do not completely remove the earwax, a person may need to combine the treatment with the warm water and rubber syringe to flush or irrigate the ear. If the problem persists past 4 days, a person should talk with their doctor.

Other household remedies

Using an eyedropper, it is also possible to apply other substances. According to a 2018 article, other products that can work to help clear wax include:

  • baby oil
  • saline
  • almond, arachis, or rectified camphor oil
  • almond or mineral oil
  • sodium bicarbonate, 10%
  • glycerin
  • acetic acid, 2.5%

The same article warns against using olive oil drops or sprays, cotton-tipped swabs, or ear candling.

Again, a person should apply one or two drops with the affected ear facing upward, wait a few minutes, then tilt the head the other way to allow the fluid to drain out. As with other remedies, a person should not put any of these in their ear unless their eardrum is intact or the treatment is approved by a doctor.

Should you use ear candles?

People should avoid using ear candles to treat earwax blockages.

Using ear candles is also known as ear coning or thermal-auricular therapy. It involves covering a hollow fabric cone in wax or paraffin, inserting it into the ear of a person lying on their side, and then lighting it. A paper plate protects the skin by catching any dripping wax.

The theory is that ear candling creates suction to pull the earwax out of the ear.

According to a 2016 study, a person should avoid ear candling and opt for safer methods to remove earwax buildup. The American Academy of Otolaryngology–Head and Neck Surgery Foundation also warns against the use of ear candles, citing that the Food and Drug Administration (FDA) has removed several products from the market due to safety concerns.

There are safer and more effective methods of treating earwax blockages, so a person should not attempt to use ear candles.

Is it safe?

When done properly, following all instructions on home kits or from a doctor, a person can safely remove earwax at home.

However, several groups of people should avoid using any method to remove earwax at home. Some people who should not useTrusted Source home remedies or OTC kits include those who:

  • cannot sit upright or who are unable to sit still
  • have a foreign body stuck in the ear
  • have had ear surgery or inner ear issues
  • have a hole or tear in the ear drum
  • get swimmer’s ear
  • have severe swimmer’s ear
  • have a history of middle ear disease
  • have had radiation in the area

If a person has any doubts, they should talk with their doctor instead of attempting to clean out their earwax at home.

How to use an earwax removal kit

Earwax removal kits or irrigation systems can vary slightly, based on the active ingredients and the exact device used. A person should follow all instructions on the box and from their doctor before using the kit.

In general, a person will likely take these steps to clean their earwax using irrigation or a home kit system, per a 2021 articleTrusted Source:

  1. A person should find a comfortable chair to sit upright in and tilt their head to the side, then place a few drops of warm water, saline, hydrogen peroxide, or the provided solution in the kit into the ear.
  2. They should then sit with their head tilted to the side for about 15 to 30 minutes.
  3. After the solution has soaked into the earwax, the person should use the provided device to suck the solution into the bulb or flush the ear wax from the ear.
  4. When finished, the person should dry the surrounding area.

If any issues occur, a person should see their doctor as soon as possible.

Symptoms

The most commonTrusted Source symptom of earwax blockages is a temporary hearing problem or hearing loss. This may be worrying, but usual hearing should return upon removal of the blockage.

Other symptoms may include:

  • pain in the ear
  • tinnitus, or ringing in the ear
  • dizziness
  • a feeling of fullness in the ear
Prevention

Inserting cotton buds or other objects into the ear in an attempt to clean it can actually cause or worsen an earwax blockage. This is because the objects push the earwax further down into the ear canal.

To prevent earwax blockages, a person should avoid sticking anything into their ear. Earwax may seem unpleasant, but cleaning is not usually necessary. The ears are actually self-cleaning and should push most wax out.

If the body is producing excessive amounts of earwax, people can buy OTC ear drops to deal with the problem safely.

Another method of preventing earwax blockages involves a person placing drops of a solution into their ears a few times per month to help soften the earwax. People can choose from a range of products online, including:

  • earwax removal drops
  • mineral oil
  • hydrogen peroxide

Regularly irrigating the ear may help prevent earwax buildups, but it is usually best to save this for treating an actual blockage. A person should never irrigate the ears of young children without talking with a doctor first.

When to see a doctor

People can treat most earwax blockages at home. However, the ear canal and eardrum are delicate, so it can be safer to visit a doctor for earwax removal.

People should also see a doctor if they have bleeding or drainage from the ear or are in significant pain, as another issue may be causing the symptoms.

Anyone with concerns about impacted cerumen in a young child should make an appointment with a pediatrician. They will be able to check the child’s ears and recommend treatment options.

A doctor may remove the blockage using specialized ear instruments.

A person may need to see their doctor after a few days if symptoms persist or get worse with home treatment.

Frequently asked questions

Here are some frequently asked questions about earwax removal.

Is it OK to put hydrogen peroxide in your ear?

Hydrogen peroxide may help with earwax removal. A person can apply the hydrogen peroxide to a cotton ball and then gently apply it to the ear. They may also apply the drops directly with a dropper.

What dissolves earwax fast?

A few drops of hydrogen peroxide can help soften earwax within 30 minutesTrusted Source. After applying the hydrogen peroxide, a person will need to tilt their head one way for several minutes and then tilt it the other way. This is to ensure that the fluid drips down into the ear canal to reach the blockage before draining it out.

How can I remove earwax at home?

Various home remedies can help remove earwax at home. These include hydrogen peroxide, warm water with a rubber ball syringe, and ear drops.

Will earwax go away on its own?

In most cases, earwax will fall out on its own. However, if a person has symptoms of an earwax blockage, such as hearing loss and ear pain, it may be necessaryTrusted Source to remove the earwax. It is best for a person to contact their doctor if the blockage persists after a few days, the ear becomes painful, or the person is a child.

Epic Ear Wax Extraction: David vs. Goliath (Tiny Canal Edition!) Read More
Ingrown toenail – inflamed finger!

Ingrown toenail – inflamed finger!

How To Remove Acrylic Nails Without Damaging Your Natural Nails

DIY nail removal is all about technique.

There’s something undeniably appealing about a fresh set of acrylic nails—they add length and polish to your natural nails while also creating endless opportunities for experimenting with nail designs and colors. Even with new trendy mani options like dip powder and builder gel nails available, our love for acrylic nails will never fade. (And neither will they—acrylics have some serious staying power).

The flip side of that staying power is figuring out how to remove acrylic nails without damaging your natural nails. You definitely can’t rip them off (you’ll regret it if you try). And while TikTok is full of hacks for removing acrylic nails, these viral techniques don’t always work.

Ultimately, heading to the salon for professional removal is the safest way to remove acrylics. But if that’s not in the cards, rest assured that safe and effective DIY acrylic nail removal techniques do, in fact, exist. Here, we’ll explain how to remove acrylic nails at home without damage and offer some of our best tips for keeping your nails strong, healthy, and nail art-ready.

How Do I Remove Acrylic Nails at Home?

There are a few safe ways to get acrylic nails off at home, including options that don’t require acetone. And if you’re at all intimidated by the thought of channeling your inner nail tech, don’t be: Learning how to remove acrylic nails without damage is way easier than you might think.

Whether your go-to is a classic French manicure or you’re switching it up with eye-catching neon nails, the below removal options should work for you.

What Is the Best Way To Remove Acrylic Nails?

One of the most common ways to remove acrylic nails without damaging your natural nails is an acetone soak. This is what you’ve likely experienced at salons, but it can be easily replicated at your kitchen table.

What you’ll need:

• Nail clippers

• Nail file

• 100% acetone nail polish remover

• Petroleum jelly

• Cotton balls

• Aluminum foil

How to remove acrylic nails with acetone

Step 1: Clip

Start by using a nail clipper to cut excess length from your acrylics. The less nail that’s left to work with, the better.

Step 2: Prep

File and buff the tops of your nails to remove any nail polish that was applied on top of the acrylics. Then, prep your cuticles for an acetone soak by applying cuticle oil or petroleum jelly to the base of your nail beds and your fingers (this helps prevent your cuticles from drying out).

Step 3: Wrap and soak

Saturate a cotton ball with acetone nail polish remover and place it on top of your acrylic, covering the nail completely. Wrap a piece of aluminum foil around the tip of your finger to cover your nail and the cotton ball, and repeat for each nail.

Step 4: Wait

Now comes the easy part. Sit back and relax for about 20 minutes while the acetone does its thing (we suggest taking the opportunity to find some inspo for your next nail look).

Step 5: Flake away (or soak again)

Once the time is up, gently lift the aluminum foil off from one of your nails. The acrylic should be soft enough that you can flake it off without too much effort. If it’s not quite there yet, leave your nails to soak for an additional five to 10 minutes.

How Do I Remove Acrylic Nails Without Acetone?

If you’re not a fan of using acetone to remove nails, we have a DIY tutorial to keep handy. This acrylic nail removal technique is a snap sans acetone and only takes a little more time to complete.

How to take off acrylic nails without acetone

Step 1: Clip

Again, begin by clipping your acrylics as short as possible.

Step 2: Tweeze

Using a pair of tweezers or a cuticle stick, gently pry and lift the edges of your acrylics. The key word here is gently. Try to force it, and you’ll be in for a world of pain—plus almost certain nail damage.

Step 3: Soak

Next, pour some acetone-free nail polish remover into a bowl, making sure it’s deep enough that you can fully submerge your fingertips. Let your nails soak for 30 to 40 minutes or until the acrylics begin to noticeably loosen.

Step 5: Peel

When the acrylics begin to lessen their grip, use your tweezers to gently pull them off of your nailbeds. If you have to force it, soak your fingers in the polish remover a bit longer.

How To Take Off Acrylic Nails Quickly

If you don’t have time to soak your nails, you can use floss—waxed or unwaxed—to take off acrylic nails when they’re growing out. While this method will get off acrylic nails fast, it can lead to nail damage if done too soon. So make sure those acrylics are really hanging on by a thread (get it?) before trying this one.

How to take off acrylic nails quickly without soaking them first

First, ensure your nails are ready for removal—they need to be noticeably loose and grown out for this method to work. If they are, gather your tools and get to work.

What you’ll need:

• Cuticle stick

• Dental floss sticks

Step 1: Lift up

Grab your cuticle stick and gently lift the edges of your acrylics with it. If your acrylic nails have already begun to lift, you may not need to do much for this step.

Step 2: Pop off

After the edges of your acrylic nails have lifted, insert a piece of dental floss under the base of the acrylic. Carefully move the floss up the nail in a sawing motion until the acrylic pops off.

What Is the Safest Way To Remove Acrylics?

While there are several ways to remove acrylics, the quickest and most effective way is to visit the salon and have a professional do it for you. You’re less likely to experience unwanted damage when you visit an expert—simply because they have access to more powerful formulas and tools than you have at home.

Barring a salon visit, your second-best option is the at-home acetone soak. Work slowly, be gentle, and exercise patience: Ultimately, the slower you go, the less likely you are to damage your nails or cuticles.

How To Care For Your Nails After Removing Acrylics at Home

Taking care of your natural nails is always important, but especially crucial after you’ve removed your acrylics. Follow these tips to ensure you’re left with strong and healthy-looking nails.

Step 1: Buff your nails

After you remove your acrylics, you may be left with some residue from the bonder. Use a glass nail file to buff the tops of your nails and remove that residue. This will keep your nails smooth and free of any jagged texture that can snag clothing, skin, and other delicate objects.

Step 2: Treat your nail beds

Post acrylic removal, your cuticles may need a little TLC. Apply cuticle oil around the perimeter of your nail to help soften and care for them (and your entire nail bed).

Step 3: Hydrate your hands

Finally, show your hands some love by reaching for a hydrating hand cream.

What To Use on Your Nails After Acrylic Removal

Whether you’re committed to at-home removal or only go the DIY route in a pinch, it’s important to pay attention to your hands and nails. Here, learn how to care for nails so they stay strong and healthy-feeling day after day.

Cuticle oil

Cuticle oil is an essential part of nail care (aftercare especially) and should be used before, during, and after a manicure to keep your cuticles and nail beds soft and moisturized. Consider keeping a bottle in your nightstand and making oiling your cuticles part of your nightly pre-bed ritual.

Hand cream

No matter how safely you remove your acrylic nails, the process can leave your hands and cuticles feeling dry. To counteract any dryness, slather your hands in a hydrating cream or lotion at least once a day (though more often can’t hurt).

SPF

You likely know that you should be applying SPF to your face and neck, but don’t neglect your hands. While acrylic nail application doesn’t require a UV lamp to cure the way gels do, it’s still important to keep your hands protected from damaging rays.

We love the L’Oréal Paris Bright Reveal Broad Spectrum SPF 50 Daily UV Lotion because it has a lightweight feel and offers broad-spectrum protection against UVA and UVB rays.

Ingrown toenail – inflamed finger! Read More